Monday, January 31, 2011
Card Patterns 100
I love the sketches over at Card Patterns, they are so inspiring and help to get the mojo flowing.
I rotated pattern 100 to create this card.
I used one of my favourite go to colour combos, pink and green.
Thanks for stopping by!
PS: Check out my giveaway here. I'm up to 103 followers! Thanks everyone!
Sunday, January 30, 2011
Things Making Me Happy Today
Saturday, January 29, 2011
Brittany's 2010 Book
I have more 2010 pictures of her than Brianne and was able to make a 8 by 8 album.
Like Brianne's book, I've used Crate Paper along with embellis from my stash.
And totally not on topic, I've been sorting through and filing my 12 by 12 album pages recently.
They are almost all done and the pages I enjoy most are the ones of everyday stuff that sometimes you forget about.
In 2010 I made more cards than scrapbook pages and when I did scrapbook focussed mainly on trip albums(which I also enjoy).
And while I'm going to continue with both cards and trip albums, I'm going to make sure I scrap more of the everyday stuff too!
So what about you? Do you like to make cards, scrapbook everyday events or scrapbook only special trips/occasions?
PS: Check out my giveaway here. I'm up to 102 followers! Thanks everyone!
Friday, January 28, 2011
PW's Olive Bread
It turned out really well and it was so nice to be waited on!
Steve even tried out a new recipe from Pioneer Woman, Olive Bread. It is sooooo good but you must like olives!
Olive Bread
1 loaf French Bread
6 ounces, weight Pimiento-stuffed Green Olives
6 ounces, weight Black Olives
2 stalks Green Onions (scallions)
1 stick Butter, Room Temperature
½ cups Mayonnaise
¾ pounds Monterey Jack Cheese, Grated
Preparation Instructions
Roughly chop both black olives and pimiento-stuffed green olives. Slice green onions into thin pieces.
Combine butter, mayonnaise, cheese, olives and green onions in a mixing bowl. Stir together until thoroughly combined. Spread mixture onto French bread that has been sliced lengthwise. Bake at 325ºF for 25 to 30 minutes or until cheese is melted and browning.
Mixture can also be refrigerated (up to two days) and used as a dip. Great with crackers.
Enjoy!
PS: Check out my giveaway here. I'm up to 102 followers! Thanks everyone!
Wednesday, January 26, 2011
Little Red Wagon Challenge # 65 - Lace
Its my turn to set this week's Little Red Wagon challenge. So how about we add some lace to our creations this week.
I created a card following Card Patterns 99 to which I added a bit of lace:
I think the lace goes perfectly with Basic Grey's Cappella paper.And isn't that Stamping Bella image cute?
We'd love it if you'd join us over at Little Red Wagon with your lacey creation.
Thanks for stopping by.
PS: Check out my giveaway here.
Tuesday, January 25, 2011
Papertrey January Blog Hop Challenge
I decided to use their anniversary stamp set Round and Round that I think I've only used one other time. And given the cold winter weather I picked a distinctly spring inspired colour scheme to create this card:
I also used PTI plum pudding and spring moss inks. And I love the addition of a doily!
Does it make you think of spring, it sure does me.
Thanks for stopping by!
PS: Check out my giveaway post here.
Sunday, January 23, 2011
Thinking of Spring.....
See over there to the left? I've been at 99 followers for a couple of weeks now, 99! Which is great but I sure would like to break the 100 barrier.
So if you're a regular reader(and even if you're not) of my blog and you're not a follower, perhaps you could consider becoming one?
And when I hit 111(because it's a fun number and it's 2011) followers I'll randomly choose one of my followers for a giveaway, some handmade cards and chocolate too!
Thanks so much!
Saturday, January 22, 2011
One Layer Challenge # 37
Creating it was my reward after I did some more organizing and purging today. I went through my clothes and costume jewelry, and though it can be daunting at first it feels so good when its done. I think it also helps to keep those winter blues at bay.
Anyway back to the card, it is for Simplicity's one-layer challenge to use more than one sentiment and no image. I added a bit of detail with some embossing and twine.
Thanks for stopping by!
Thursday, January 20, 2011
Love U
And since one of my New Year's resolutions is to use my Cricut more, I used the Lyrical Letters cartridge to cut the heart, the sentiment and the heart border. Then following CPS sketch #201 and Thrift Shoppe paper I created this card:
I think I like the mix of patterns.
Thanks for stopping by!
Crate Paper New Release
This will be a card making necessity!
And I'm inspired to start my daughters 2011 books already!
For more Crate previews click here.
Wednesday, January 19, 2011
Little Red Wagon # 64 - One Layer Card
I'm back with another Little Red Wagon challenge, this week Regan has challenged us to create a one layer card. And that is always a challenge!
Here's what I came up with:
Please join us over at Little Red Wagon and link up your one layer card, we love to see what you create! And while you're there please check out all the other cards too!
Thanks for stopping by!
Sunday, January 16, 2011
Quick Tortellini Soup
My blog has been suffering a bit lately as I've been using my spare time organizing. My scrap room is improving and this weekend I got the cold room organized complete with labels. The labels are meant to help my daughters put stuff away so it doesn't end up a jumbled mess again. I'll let you know how that goes.
I've also been purging magazines and only keeping interesting recipes and articles. I've got one small pile left to do and they're all done! The result
of this is that I now have a bunch of new recipes to try out and then post on my blog.
This weekend I had a chance to try out a quick soup recipe from Taste of Home,Veggie Tortellini Soup.
Its very easy and makes a fairly large quantity. It has lots of veggies and at 215 calories per 1 1/2 cups I'll definitely make it again!
Here's the recipe:
5 cups chicken broth
1 package (16 ounces) frozen California-blend vegetables
1 package (8 ounces) dried cheese tortellini
1 can (14-1/2 ounces) Italian diced tomatoes, undrained
In a Dutch oven, bring broth to a boil. Stir in vegetables and tortellini. Return to a boil. Reduce heat; simmer, uncovered, for 10-12 minutes or until vegetables are tender, stirring occasionally. Stir in tomatoes. Cover and cook for 5-6 minutes or until heated through. Yield: 6 servings.
Thanks for stopping by!
Friday, January 14, 2011
Brianne's 2010 Book
We didn't get a lot of photos of her this past year but I did steal some off of her camera when she wasn't looking.
Because I didn't have many pictures, this was the perfect opportunity to use a Kaisercraft board book. I then used primarily Crate Paper papers and lots of embellishments from my 'stash'.
Thanks for stopping by!
Wednesday, January 12, 2011
Little Red Wagon Challenge # 63 - Envelopes!
I'm late with this week's Little Red Wagon post as I ended up making my card for next week's challenge instead of this week's, oops! So on the positive side, my post for next week is done!
And here's my envelope for this week's envelope challenge issued by Avril!
I decided to make an envelope to coordinate with one of my favourite cards using one of my favourite papers, Thrift Shoppe by October Afternoon:
I lined the interior of the envelope then edged the flap with coordinating paper made even prettier by using a border punch!
We love to see what you create so please link up your envelopes over at Little Red Wagon! And while you're there check out all the other creations too!
Friday, January 07, 2011
Thursday, January 06, 2011
Kitchen Cupboard Remodel
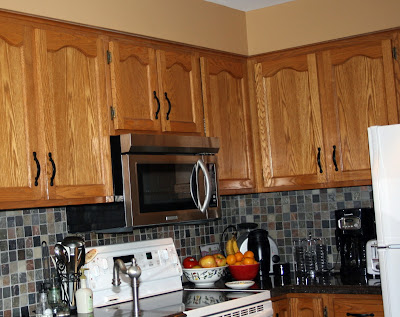
There was nothing really wrong with the cupboards other than being way out of style.
And a little beat up!
Lots of oak.
One last before shot.
Shortly before Christmas I decided that they needed to be painted. There's nothing like having the deadline of Christmas to make you get stuff done!
So we had them sprayed with 3 coats of a lacquer type paint. Very durable stuff!
I had the uppers and the pantry wall painted in Benjamin Moore CC50 then antiqued.
Then the lower cupboards were painted black.
I had all the hinges, knobs and handles replaced in a brushed nickel to match the faucet.
We broke down and replaced the white appliances with stainless.
Except for the dishwasher, it will need replacement at some point and I think I'll get a black front to match the lower cupboards.
And we put up crown moulding with the bulkhead painted the same colour as the cupboards. It gives them a more custom look and takes the eye up.
Overall, I'm pretty happy with the result, a more current kitchen at a fraction of the cost of new!